Site to site with OpenVPN with TLS and FirewallD on Debian
So I needed to setup a site to site transport between our two datacenters, so our internal network will be able to communicate between the two datacenters easily.
There are a lot of ways to setup site to site VPN link between two networks, in our case let’s take a look at one way using OpenVPN.
This is quite long tutorial so get yourself a bit comfortable so we can get started.
Our network looks like this
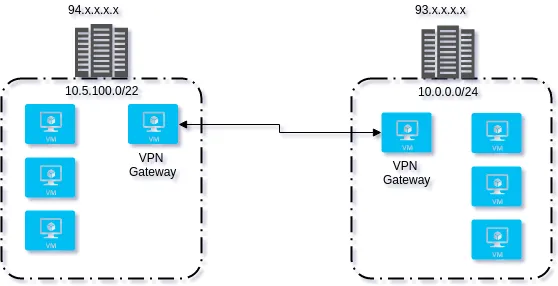
Datacenter at location A has internal network 10.5.200.20 on the interface eth1 and 94.x.x.x.x on eth0, we will configure the openvpn server on this location. Datacenter at location B has internal network 10.0.0.5 on the interface eth1 and 93.x.x.x.x on eth0.
Both machine have two network interfaces eth0 which is connected to the internet, and eth1 which is connected the the LAN
The IP subnet has to be different for this to work, if they are on the same subnet this won’t work.
VPN gateway at location A
So to begin login to the machine in the location A
Forwarding
$ cat <<EOF > /etc/sysctl.d/30-openvpn-forward.confnet.ipv4.ip_forward = 1net.ipv6.conf.all.forwarding = 1EOF$ sysctl -p /etc/sysctl.d/30-openvpn-forward.confnet.ipv4.ip_forward = 1net.ipv6.conf.all.forwarding = 1Installation
apt-get install openvpn easy-rsa firewalldFirewall
Let’s configure the firewall to allow us to connect to the machine and all the necessary configuration needed for it
$ firewall-cmd --permanent --zone=public --add-source=93.x.x.x/32$ firewall-cmd --permanent --zone=trusted --add-interface=eth1$ firewall-cmd --permanent --zone=trusted --add-interface=tun0$ firewall-cmd --permanent --zone=trusted --add-masquerade$ DEV=$(ip route get 8.8.8.8 | awk 'NR==1 {print $(NF-2)}')$ firewall-cmd --permanent --direct --passthrough ipv4 -t nat -A POSTROUTING -s 172.16.1.0/24 -o $DEV -j MASQUERADE$ firewall-cmd --reloadGenerating OpenVPN keys
After we have installed all this we need to generate some configuration and tls keys for us to use.
$ make-cadir ~/ca$ cd ~/ca$ ls -lahdrwx------ 2 root root 4.0K Feb 5 21:23 .drwxr-xr-x 4 root root 4.0K Feb 5 21:23 ..lrwxrwxrwx 1 root root 28 Feb 5 21:23 build-ca -> /usr/share/easy-rsa/build-calrwxrwxrwx 1 root root 28 Feb 5 21:23 build-dh -> /usr/share/easy-rsa/build-dhlrwxrwxrwx 1 root root 31 Feb 5 21:23 build-inter -> /usr/share/easy-rsa/build-interlrwxrwxrwx 1 root root 29 Feb 5 21:23 build-key -> /usr/share/easy-rsa/build-keylrwxrwxrwx 1 root root 34 Feb 5 21:23 build-key-pass -> /usr/share/easy-rsa/build-key-passlrwxrwxrwx 1 root root 36 Feb 5 21:23 build-key-pkcs12 -> /usr/share/easy-rsa/build-key-pkcs12lrwxrwxrwx 1 root root 36 Feb 5 21:23 build-key-server -> /usr/share/easy-rsa/build-key-serverlrwxrwxrwx 1 root root 29 Feb 5 21:23 build-req -> /usr/share/easy-rsa/build-reqlrwxrwxrwx 1 root root 34 Feb 5 21:23 build-req-pass -> /usr/share/easy-rsa/build-req-passlrwxrwxrwx 1 root root 29 Feb 5 21:23 clean-all -> /usr/share/easy-rsa/clean-alllrwxrwxrwx 1 root root 33 Feb 5 21:23 inherit-inter -> /usr/share/easy-rsa/inherit-interlrwxrwxrwx 1 root root 24 Feb 5 21:23 keys -> /usr/share/easy-rsa/keyslrwxrwxrwx 1 root root 28 Feb 5 21:23 list-crl -> /usr/share/easy-rsa/list-crl-rw-r--r-- 1 root root 7.7K Feb 5 21:23 openssl-0.9.6.cnf-rw-r--r-- 1 root root 8.3K Feb 5 21:23 openssl-0.9.8.cnf-rw-r--r-- 1 root root 8.2K Feb 5 21:23 openssl-1.0.0.cnf-rw-r--r-- 1 root root 8.2K Feb 5 21:23 openssl.cnflrwxrwxrwx 1 root root 27 Feb 5 21:23 pkitool -> /usr/share/easy-rsa/pkitoollrwxrwxrwx 1 root root 31 Feb 5 21:23 revoke-full -> /usr/share/easy-rsa/revoke-fulllrwxrwxrwx 1 root root 28 Feb 5 21:23 sign-req -> /usr/share/easy-rsa/sign-req-rw-r--r-- 1 root root 2.1K Feb 5 21:23 varslrwxrwxrwx 1 root root 35 Feb 5 21:23 whichopensslcnf -> /usr/share/easy-rsa/whichopensslcnfYou can replace the openssl.cnf with whichever version you want to use for generation, I decided to go with openssl-1.0.0.cnf
Open the file ~/ca/vars and update accordingly, you can customize it however you want but you should at least modify the following to suit your organization.
export KEY_COUNTRY="US"export KEY_PROVINCE="CA"export KEY_CITY="SanFrancisco"export KEY_ORG="Fort-Funston"export KEY_EMAIL="me@myhost.mydomain"export KEY_OU="MyOrganizationalUnit"After you have edited the file you need to source it so we have the environment variables ready, to do so you can just run
$ cd ~/ca$ . ./vars$ env | grep ^KEYKEY_OU=MyOrganizationalUnitKEY_SIZE=2048KEY_NAME=EasyRSAKEY_EXPIRE=3650KEY_EMAIL=me@myhost.mydomainKEY_ORG=Fort-FunstonKEY_CITY=SanFranciscoKEY_COUNTRY=USKEY_PROVINCE=CAKEY_CONFIG=/root/ca/openssl.cnfKEY_DIR=/root/ca/keys$ ./clean-allNow you are ready to build your ca key and tls-crypt key for OpenVPN
$ cd ~/ca$ ./build-ca$ openvpn --genkey --secret ~/ca/keys/ta.keyYou CA is ready now we have to generate a server key, make sure you sign the certificate when asked
$ cd ~/ca$ ./build-key-server server$ ./build-dhAnd we also need to generate a client key for each client that will connect, make sure you sign the certificates when asked
$ cd ~/ca$ ./build-key locbNow let’s see what have we generated your keys folder should have the following files
$ ls -lh ~/ca/keystotal 84K-rw-r--r-- 1 root root 5.4K Feb 5 21:31 01.pem-rw-r--r-- 1 root root 5.3K Feb 5 21:35 02.pem-rw-r--r-- 1 root root 1.7K Feb 5 21:30 ca.crt-rw------- 1 root root 1.7K Feb 5 21:30 ca.key-rw-r--r-- 1 root root 424 Feb 5 21:33 dh2048.pem-rw-r--r-- 1 root root 238 Feb 5 21:35 index.txt-rw-r--r-- 1 root root 21 Feb 5 21:35 index.txt.attr-rw-r--r-- 1 root root 21 Feb 5 21:31 index.txt.attr.old-rw-r--r-- 1 root root 120 Feb 5 21:31 index.txt.old-rw-r--r-- 1 root root 5.3K Feb 5 21:35 locb.crt-rw-r--r-- 1 root root 1.1K Feb 5 21:35 locb.csr-rw------- 1 root root 1.7K Feb 5 21:35 locb.key-rw-r--r-- 1 root root 3 Feb 5 21:35 serial-rw-r--r-- 1 root root 3 Feb 5 21:31 serial.old-rw-r--r-- 1 root root 5.4K Feb 5 21:31 server.crt-rw-r--r-- 1 root root 1.1K Feb 5 21:31 server.csr-rw------- 1 root root 1.7K Feb 5 21:31 server.key-rw------- 1 root root 636 Feb 5 21:30 ta.keyNow we have everything so we can send finally do the connection between our datacenters.
Configuration
So let’s prepare some things before we start
$ mkdir -p /etc/openvpn/ccd$ cp -v ~/ca/keys/{ca.crt,server.*,dh2048.pem,ta.key} /etc/openvpn/server'/root/ca/keys/ca.crt' -> '/etc/openvpn/server/ca.crt''/root/ca/keys/server.crt' -> '/etc/openvpn/server/server.crt''/root/ca/keys/server.csr' -> '/etc/openvpn/server/server.csr''/root/ca/keys/server.key' -> '/etc/openvpn/server/server.key''/root/ca/keys/dh2048.pem' -> '/etc/openvpn/server/dh2048.pem''/root/ca/keys/ta.key' -> '/etc/openvpn/server/ta.key'And now lets make our configuration for the server. We need to create a separate user for our process to run in, so it’s isolated from the system.
$ addgroup ovpn$ useradd --shell=/bin/false -g ovpn ovpn$ cat /etc/openvpn/server.confdev tunpersist-keypersist-local-ippersist-remote-ippersist-tuntopology subnetport 1194proto udpkeepalive 10 60
ca /etc/openvpn/server/ca.crtcert /etc/openvpn/server/server.crtkey /etc/openvpn/server/server.keydh /etc/openvpn/server/dh2048.pem
server 172.16.1.0 255.255.255.0client-to-client
client-config-dir ccd
explicit-exit-notify 10
user ovpngroup ovpn
tls-crypt /etc/openvpn/server/ta.keyauth SHA512tls-version-min 1.2tls-cipher TLS-DHE-RSA-WITH-AES-256-GCM-SHA384:TLS-DHE-RSA-WITH-AES-256-CBC-SHA256ncp-ciphers AES-256-GCM:AES-256-CBC
ifconfig-pool-persist ipp.txtstatus openvpn-status.loglog /var/log/openvpn.logverb 4
route 10.0.0.0 255.255.255.0
tun-mtu 1500tun-mtu-extra 32mssfix 1450reneg-sec 0
cipher AES-128-CBC
All the configuration in here is self explanatory, the only thing worth of not is route 10.0.0.0 255.255.255.0, which needs to be in the main file so the server knows that it needs to route that subnet to the connected client, if you don’t add that line then we will be missing the required routes to access the server.
Now we need to setup the vm in the location b, we still have to install the same packages as for location a, but before we do that we need to create a configuration file for the client
$ cd /etc/openvpn/ccdcat <<EOF > /etc/openvpn/ccd/locbpush "route 10.5.100.0 255.255.252.0"iroute 10.0.0.0 255.255.255.0EOFThis will tell that the client locb when connected that it needs to add the route for accessing the subnet in loca and for the server to setup an internal route for the locb
Service
Let’s enable the server
$ systemctl disable openvpn$ systemctl enable openvpn@server$ systemctl restart openvpn@server$ systemctl status openvpn@server.serviceVPN gateway at location B
Now we are ready to connect we need to transfer the files ca.crt,locb.*,dh2048.pem,ta.key in the keys folder from the server to the client in /etc/openvpn/client folder.
Forwarding
$ cat <<EOF > /etc/sysctl.d/30-openvpn-forward.confnet.ipv4.ip_forward = 1net.ipv6.conf.all.forwarding = 1EOF$ sysctl -p /etc/sysctl.d/30-openvpn-forward.confnet.ipv4.ip_forward = 1net.ipv6.conf.all.forwarding = 1Installation
Let’s install the prerequisites
$ apt-get install openvpn firewalld$ addgroup ovpn$ useradd --shell=/bin/false -g ovpn ovpnFirewall
Let’s configure the firewall to allow us to connect to the machine and all the necessary configuration needed for it
$ firewall-cmd --permanent --zone=public --add-source=94.x.x.x/32$ firewall-cmd --permanent --zone=trusted --add-interface=eth1$ firewall-cmd --permanent --zone=trusted --add-interface=tun0$ firewall-cmd --permanent --zone=trusted --add-masquerade$ DEV=$(ip route get 8.8.8.8 | awk 'NR==1 {print $(NF-2)}')$ firewall-cmd --permanent --direct --passthrough ipv4 -t nat -A POSTROUTING -s 172.16.1.0/24 -o $DEV -j MASQUERADE$ firewall-cmd --reloadConfiguration
$ cat /etc/openvpn/client.confclientdev tunpersist-keypersist-tunpersist-local-ippersist-remote-ipproto udpnobinduser ovpngroup ovpnremote-cert-tls serverauth SHA512verb 4
remote s2s.example.com 1194
ca /etc/openvpn/client/ca.crtcert /etc/openvpn/client/locb.crtkey /etc/openvpn/client/locb.keytls-crypt /etc/openvpn/client/ta.key
log /var/log/openvpn.log
keepalive 10 60
$ systemctl disable openvpn$ systemctl enable openvpn@client$ systemctl restart openvpn@client$ systemctl status openvpn@client.serviceRoutes
The only thing missing now is setting up the routes required so we know where we need to go for a given subnet
/etc/network/interfaces
$ cat /etc/network/interfacessource /etc/network/interfaces.d/*
auto loiface lo inet loopback
auto ens18iface ens18 inet dhcp
auto ens19iface ens19 inet static    address 10.0.0.3    netmask 255.255.255.0    up route add -net 10.5.100.0 netmask 255.255.252.0 gw 10.0.0.5    down route add -net 10.5.100.0 netmask 255.255.252.0 gw 10.0.0.5
So now everytime our interface is configured our route will be set up so we can access the servers on the other side of the VPN
ip route
We need to add a static route on the internal network interface so we can route the subnet.
$ ip routedefault via 95.x.x.x dev ens18 onlink10.0.0.0/24 dev ens19 proto kernel scope link src 10.0.0.395.x.x.x/25 dev ens18 proto kernel scope link src 95.x.x.x
$ ping 10.5.100.10 -c1PING 10.5.100.10 (10.5.100.10) 56(84) bytes of data.
--- 10.5.100.10 ping statistics ---1 packets transmitted, 0 received, 100% packet loss, time 0ms
$ ip route add 10.5.100.0/22 via 10.0.0.5 dev ens19
$ ip routedefault via 95.x.x.x dev ens18 onlink10.0.0.0/24 dev ens19 proto kernel scope link src 10.0.0.310.5.100.0/22 via 10.0.0.5 dev ens1995.x.x.x/25 dev ens18 proto kernel scope link src 95.x.x.x
$ ping 10.5.100.10 -c1PING 10.5.100.10 (10.5.100.10) 56(84) bytes of data.64 bytes from 10.5.100.10: icmp_seq=1 ttl=62 time=2.17 ms
--- 10.5.100.10 ping statistics ---1 packets transmitted, 1 received, 0% packet loss, time 0msrtt min/avg/max/mdev = 2.171/2.171/2.171/0.000 ms
DHCP
If we use DHCP we can easily put a stateless route so all machines automatically get the correct route.
dnsmasq
We just need to add this to the DHCP server in location A and we are done, the route will be automatically setup when the client requests an IP address.
dhcp-option=121,10.5.100.0/22,10.0.0.5Testing
And now let’s see the result of our process finally
VPN gateway in location A
$ traceroute 10.0.0.3 -ntraceroute to 10.0.0.3 (10.0.0.3), 30 hops max, 60 byte packets 1 172.16.1.2 2.050 ms 2.038 ms 2.033 ms 2 10.0.0.3 2.239 ms 2.242 ms 2.315 msVPN gateway in location B
$ traceroute 10.5.100.10 -ntraceroute to 10.5.100.10 (10.5.100.10), 30 hops max, 60 byte packets 1 172.16.1.1 2.023 ms 2.007 ms 2.000 ms 2 10.5.100.10 1.991 ms 1.986 ms 1.979 msMachine in location B to a machine in location A
$ traceroute 10.5.100.10 -ntraceroute to 10.5.100.10 (10.5.100.10), 30 hops max, 60 byte packets 1 10.0.0.5 0.514 ms 0.497 ms 0.486 ms 2 * * * 3 10.5.100.10 2.238 ms 2.234 ms 2.219 msThe 2nd hop is our VPN gateway doing the forwarding
Speed
The speed we got it’s not that bad, it’s 281 Mbits/sec which is around 35 MB/s. We can make it even faster by using Elliptic curve crypto (ECC) for the keys
Machine on location A
We start an iperf server on any machine on location A by logging into it and running
$ apt-get install iperf$ iperf -s------------------------------------------------------------Server listening on TCP port 5001TCP window size: 85.3 KByte (default)------------------------------------------------------------[ 4] local 10.5.100.10 port 5001 connected with 10.5.100.10 port 42076[ ID] Interval Transfer Bandwidth[ 4] 0.0-10.0 sec 335 MBytes 280 Mbits/secMachine on location B
We start an iperf client on any machine on location B by logging into it and running
$ apt-get install iperf$ iperf -c 10.5.100.10------------------------------------------------------------Client connecting to 10.5.100.20, TCP port 5001TCP window size: 45.0 KByte (default)------------------------------------------------------------[ 3] local 10.0.0.3 port 42076 connected with 10.5.100.20 port 5001[ ID] Interval Transfer Bandwidth[ 3] 0.0-10.0 sec 335 MBytes 281 Mbits/sec